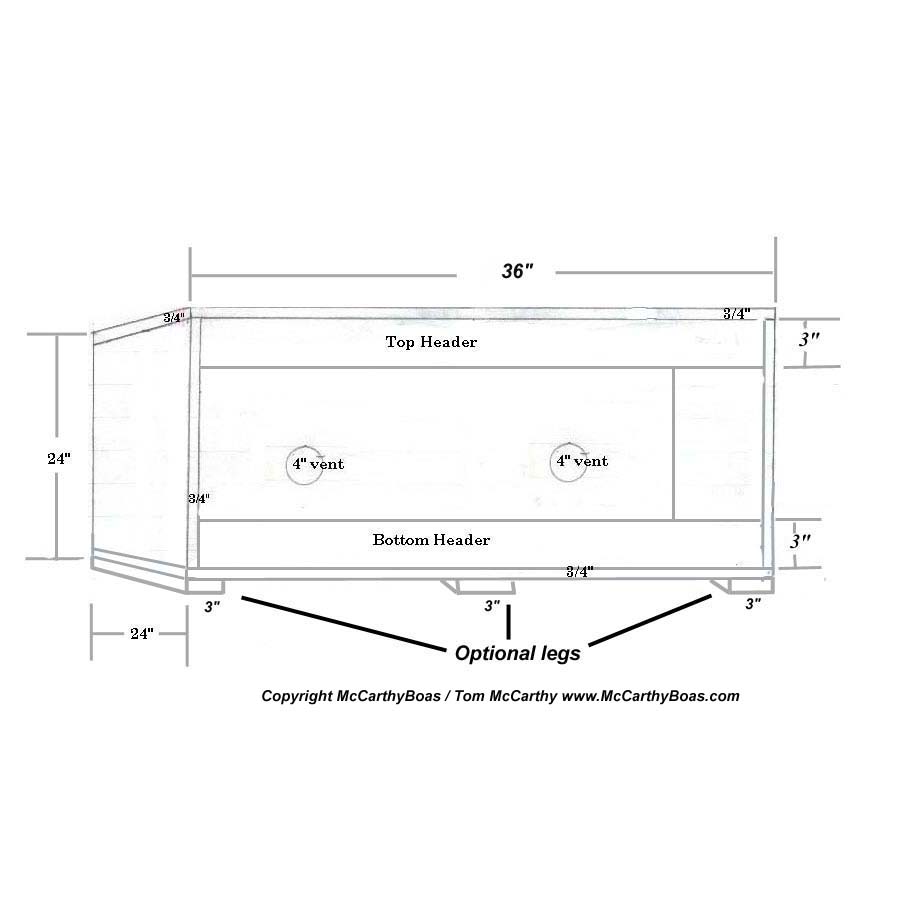
Cut Sheet for EZ- 3’ X 2’ X 2’ cage.
This is all cut out of 1 sheets of 4’ x 8’ x ¾” plywood.
# Of pieces. Size Description
2 – 36” x 24” x ¾” Top and bottom of cage.
2 – 24” x 22- ½” x ¾” Sides of cage.
1 – 34- ½” x 22- ½” x ¾” Back of cage.
2 – 34- ½” x 3” x ¾” Top & bottom header of cage.
3 – 24” x 3” x ¾” Optional legs for cage.
Hardware for cage.
2 – 18” x 16-1/16” x ¼” Tempered or Plexi- glass for cage.
1 – 8 – oz. Bottle of wood glue. (Gorilla Glue)
1 – 48” Sliding door track for cage cut to fit.
1 – 25’ x ¾” Edge banding of all exposed edges of cage.
1 – 10 – oz. Tube of clear kitchen & bath silicone caulk.
1 – 10 – oz. Liquid Nails Adhesive caulk. (For Track)
1 – 32 oz. Stain.
2 – 4” Round PVC drain vents (Lowe’s)
1 – Jewelry case lock.
2 – 11.5 oz (spray can) Helmsman Spar Urethane (Minwax)
1 – 32 – oz. kit Clear high build epoxy finish (Envirotex)
1 – 3.25 – oz. Wood filler. (Elmer’s )
2 – 2- ¾” x 7/8” x 1/8” Self adhesive Acrylic door handles.
1 – 2” Box of wood screws.
1 – 1- ¼” Box of wood screws. (For optional legs)
Counter sink all screws and wood fill them.
“Install all lighting and heating as you see fit for your needs.”
Copyright McCarthyBoas / Tom McCarthy www.McCarthyBoas.com
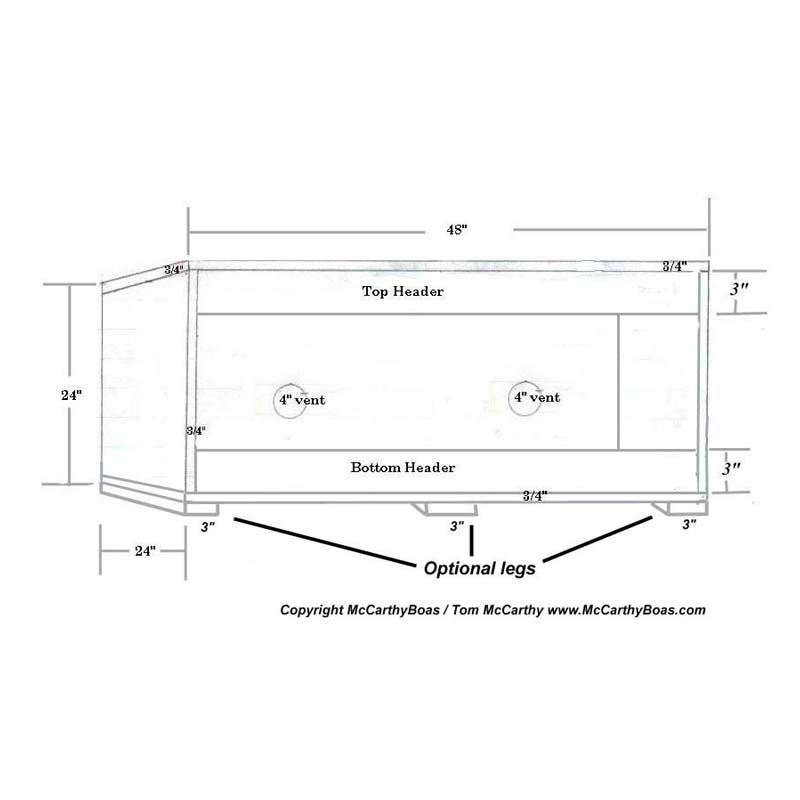
Cut Sheet for EZ- 4’ X 2’ X 2’ cage.
This is all cut out of 2 sheets of 4’ x 8’ x ¾” plywood.
# Of pieces. Size Description
2 – 48” x 24” x ¾” Top and bottom of cage.
2 – 24” x 22- ½” x ¾” Sides of cage.
1 – 46 – ½” x 22- ½” x ¾” Back of cage.
2 – 46- ½” x 3” x ¾” Top & bottom header of cage.
3 – 24” x 3” x ¾” Optional legs for cage.
Hardware for cage.
2 – 24” x 16-1/16” x ¼” Tempered or Plexi- glass for cage.
1 – 8 – oz. Bottle of wood glue. (Gorilla Glue)
1 – 48” Sliding door track for cage.
2 – 25’ x ¾” Edge banding of all exposed edges of cage.
1 – 10 – oz. Tube of clear kitchen & bath silicone caulk.
1 – 10 – oz. Liquid Nails Adhesive caulk. (For Track)
1 – 32 oz. Stain.
2 – 4” Round PVC drain vents (Lowe’s)
1 – Jewelry case lock.
3 – 11.5 oz (spray can) Helmsman Spar Urethane (Minwax)
1 – 32 – oz. kit Clear high build epoxy finish (Envirotex)
1 – 3.25 – oz. Wood filler. (Elmer’s )
2 – 2- ¾” x 7/8” x 1/8” Self adhesive Acrylic door handles.
1 – 2” Box of wood screws.
1 – 1- ¼” Box of wood screws. (For optional legs)
Counter sink all screws and wood fill them.
“Install all lighting and heating as you see fit for your needs.”
Copyright McCarthyBoas / Tom McCarthy www.McCarthyBoas.com
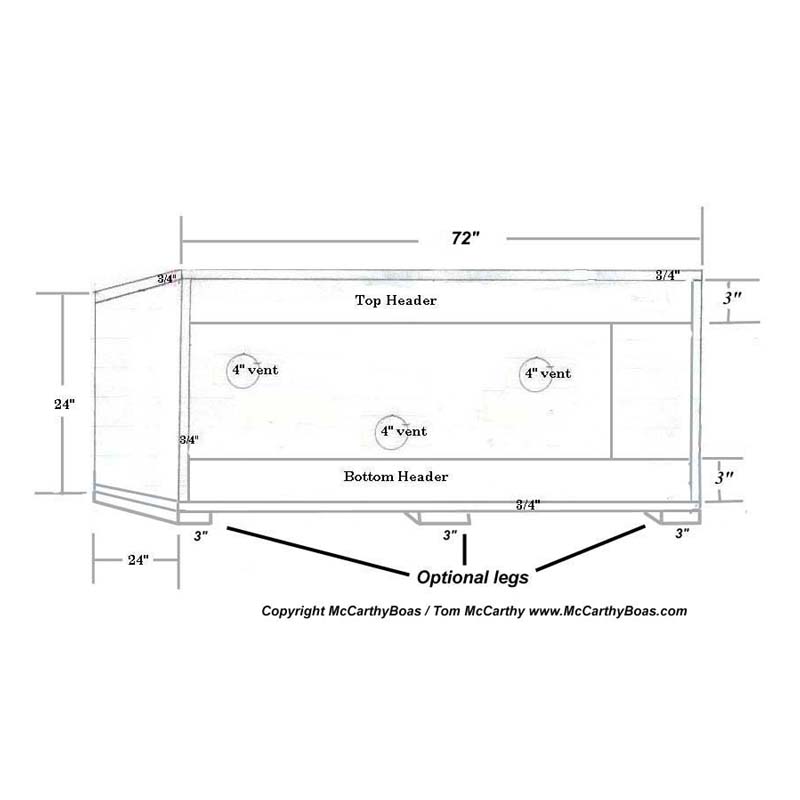
Cut Sheet for EZ- 6’ X 2’ X 2’ cage.
This is all cut out of 2 sheets of 4’ x 8’ x ¾” plywood.
# Of pieces. Size Description
2 – 72” x 24” x ¾” Top and bottom of cage.
2 – 24” x 22- ½” x ¾” Sides of cage.
1 – 70- ½” x 22- ½” x ¾” Back of cage.
4 – 70- ½” x 3” x ¾” Top & bottom header of cage.
You should double up the headers for support on a 6’ long cage.
3 – 24” x 3” x ¾” Optional legs for cage.
Hardware for cage.
2 – 36” x 16-1/16” x ¼” Tempered or Plexi- glass for cage.
1 – 8 – oz. Bottle of wood glue. (Gorilla Glue)
1 – 72” Sliding door track for cage.
2 – 25’ x ¾” Edge banding of all exposed edges of cage.
1 – 10 – oz. Tube of clear kitchen & bath silicone caulk.
1 – 10 – oz. Liquid Nails Adhesive caulk. (For Track)
1 – 32 oz. Stain.
3 – 4” Round PVC drain vents (Lowe’s)
1 – Jewelry case lock.
4 – 11.5 oz (spray can) Helmsman Spar Urethane (Minwax)
2 – 32 – oz. kit Clear high build epoxy finish (Envirotex)
1 – 3.25 – oz. Wood filler. (Elmer’s )
2 – 2- ¾” x 7/8” x 1/8” Self adhesive Acrylic door handles.
1 – 2” Box of wood screws.
1 – 1- ¼” Box of wood screws. (For optional legs)
Counter sink all screws and wood fill them.
“Install all lighting and heating as you see fit for your needs.”
Copyright McCarthyBoas / Tom McCarthy www.McCarthyBoas.com
Cut Sheet for EZ- 8’ X 2’ X 2’ cage.
This is all cut out of 3 sheets of 4’ x 8’ x ¾” plywood.
# Of pieces. Size Description
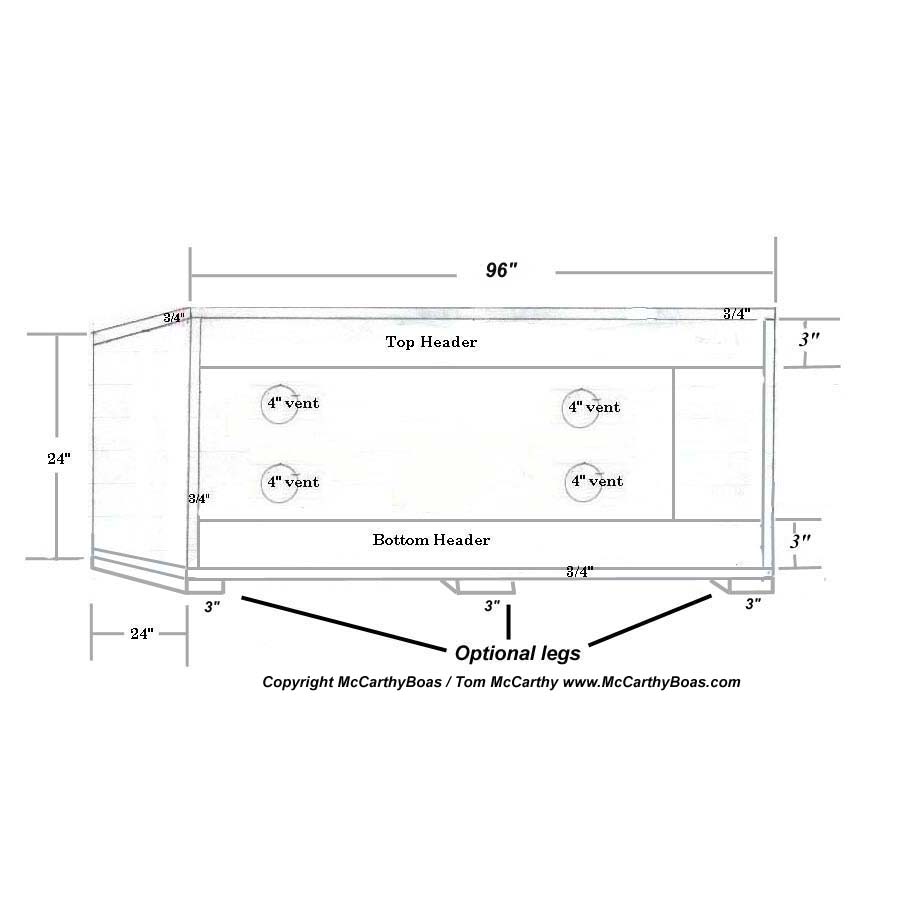
2 – 96” x 24” x ¾” Top and bottom of cage.
2 – 24” x 22- ½” x ¾” Sides of cage.
1 – 94- ½” x 22- ½” x ¾” Back of cage.
4 – 94- ½” x 3” x ¾” Top & bottom header of cage.
You should double up the headers for support on a 8’ long cage.
3 – 24” x 3” x ¾” Optional legs for cage.
Hardware for cage.
2 – 48” x 16-1/16” x ¼” Tempered or Plexi- glass for cage.
1 – 8 – oz. Bottle of wood glue. (Gorilla Glue)
2 – 48” Sliding door track for cage.
2 – 25’ x ¾” Edge banding of all exposed edges of cage.
2 – 10 – oz. Tube of clear kitchen & bath silicone caulk.
1 – 10 – oz. Liquid Nails Adhesive caulk. (For Track)
1 – 32 oz. Stain.
4 – 4” Round PVC drain vents (Lowe’s)
1 – Jewelry case lock.
6 – 11.5 oz (spray can) Helmsman Spar Urethane (Minwax)
3 – 32 – oz. kit Clear high build epoxy finish (Envirotex)
1 – 3.25 – oz. Wood filler. (Elmer’s )
2 – 2- ¾” x 7/8” x 1/8” Self adhesive Acrylic door handles.
1 – 2” Box of wood screws.
1 – 1- ¼” Box of wood screws. (For optional legs)
Counter sink all screws and wood fill them.
“Install all lighting and heating as you see fit for your needs.”
Copyright McCarthyBoas / Tom McCarthy www.McCarthyBoas.com
This is all cut out of 3 sheets of 4’ x 8’ x ¾” plywood.
# Of pieces. Size Description
2 – 96” x 24” x ¾” Top and bottom of cage.
2 – 24” x 22- ½” x ¾” Sides of cage.
1 – 94- ½” x 22- ½” x ¾” Back of cage.
4 – 94- ½” x 3” x ¾” Top & bottom header of cage.
You should double up the headers for support on a 8’ long cage.
3 – 24” x 3” x ¾” Optional legs for cage.
Hardware for cage.
2 – 48” x 16-1/16” x ¼” Tempered or Plexi- glass for cage.
1 – 8 – oz. Bottle of wood glue. (Gorilla Glue)
2 – 48” Sliding door track for cage.
2 – 25’ x ¾” Edge banding of all exposed edges of cage.
2 – 10 – oz. Tube of clear kitchen & bath silicone caulk.
1 – 10 – oz. Liquid Nails Adhesive caulk. (For Track)
1 – 32 oz. Stain.
4 – 4” Round PVC drain vents (Lowe’s)
1 – Jewelry case lock.
6 – 11.5 oz (spray can) Helmsman Spar Urethane (Minwax)
3 – 32 – oz. kit Clear high build epoxy finish (Envirotex)
1 – 3.25 – oz. Wood filler. (Elmer’s )
2 – 2- ¾” x 7/8” x 1/8” Self adhesive Acrylic door handles.
1 – 2” Box of wood screws.
1 – 1- ¼” Box of wood screws. (For optional legs)
Counter sink all screws and wood fill them.
“Install all lighting and heating as you see fit for your needs.”
Copyright McCarthyBoas / Tom McCarthy www.McCarthyBoas.com
How I seal my cages
First stain the cage any color you like then after it has dried proceed with the following directions.
I use Minwax Helmsman Spar Urethane to seal the cages inside and outside. The inside bottom and 2 to 4 inches up the
sides of each cage is sealed with Envirotex Lite a clear, high build epoxy finish to aid in cleaning, and prevent water damage
to the cages. Follow manufactures directions when using these products.
I seal the whole cage inside and outside first with the Minwax Helmsman Spar Urethane 3 to 4 coats of this. Then after it has
dried I coat the inside bottom and 2 to 4 inches up the sides of the cage with envirotex. (The clear, high build epoxy finish)
The epoxy is mixed up and then poured onto the surface. You have to mix it very well, it will have a lot of air bubbles in it.
Just pour it on the floor of your cage after you have mixed it up. Then tip the cage from side to side to help spread the epoxy
evenly over the surface. Also brush some of the epoxy on to the sides of the cage just the first 2 or 4 inches from the
bottom. You can also do this by tipping the cage more on to it's sides. Let it set for a few minute after this is done. Then
wave a propane torch over the surface to pop all the air bubbles. Once you start doing this you will get the hang of it. It is
fully cured in 72 hr. However I let it sit for 2 weeks before I use it for any reptiles. After it is cured turn the heat mat on and
close the cage up. Then let it sit for 24 hours. After the 24 hours are up open the cage up and if it smell at all I just let it cure
a few more days. Once the smell is gone it is ok to use for your reptiles.
| EZ - Cage Prints |
| "Just click on pictures and prints to see full size." |
| These prints are not for my custom wood cages, these are just basic cage plans. |
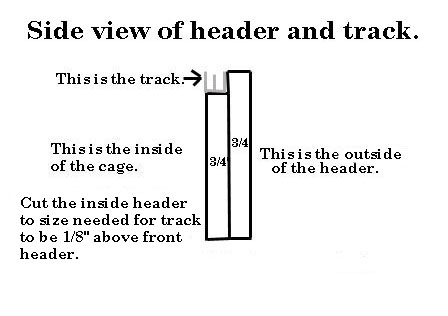
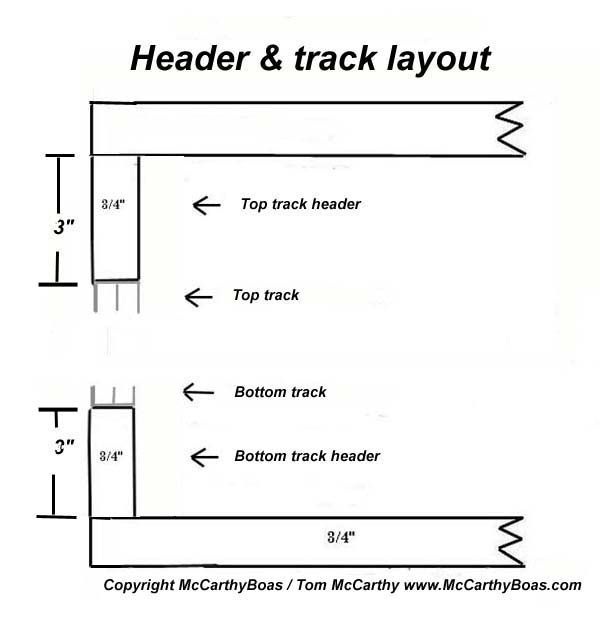
| If you want to hid the track use this print and cut two extra headers per cage. The top one should be 2- 1/2 inch tall and the bottom one should be 2 - 3/4 inches tall. |